Manual Installation
If you do not want to use packages, here is how you setup ownCloud on from scratch using a classic LAMP setup.
This document provides a complete walk-through for installing ownCloud on Ubuntu 12.04 LTS Server with Apache and MySQL. It also provides guidelines for installing it on other distributions, webservers and database systems.
Although this document tries to describe all aspects of setting up ownCloud, a basic understanding of the Linux operating system and of server administration is required.
Prerequisites
Note
This tutorial assumes you have terminal access to the machine you want to install owncloud on. Although this is not an absolute requirement, installation without it is highly likely to require contacting your hoster (e.g. for installing required modules).
To run ownCloud, your web server must have the following installed:
- PHP (>= 5.3.3 minimum, 5.4 or higher recommended)
- PHP module ctype
- PHP module dom
- PHP module GD
- PHP module iconv
- PHP module JSON
- PHP module libxml
- PHP module mb multibyte
- PHP module SimpleXML
- PHP module zip
- PHP module zlib
Database connectors (pick at least one):
- PHP module sqlite (requires sqlite >= 3.0; simple configuration, but inferior performance)
- PHP module mysql
- PHP module pgsql (requires PostgreSQL >= 9.0)
Recommended packages:
- PHP module curl (highly recommended, some functionality, e.g. http user authentication, depends on this)
- PHP module fileinfo (highly recommended, enhances file analysis performance)
- PHP module bz2 (recommended, required for extraction of apps)
- PHP module intl (increases language translation performance)
- PHP module mcrypt (increases file encryption performance)
- PHP module openssl (required for accessing HTTPS resources)
Required for specific apps (if you use the mentioned app, you must install that package):
- PHP module ldap (for ldap integration)
- smbclient (for SMB storage)
- PHP module ftp (for FTP storage)
Recommended for specific apps (optional):
- PHP module exif (for image rotation in pictures app)
For enhanced performance (optional / select only one of the following):
- PHP module apc
- PHP module apcu
- PHP module xcache
For preview generation (optional):
- PHP module imagick
- avconv or ffmpeg
- OpenOffice or libreOffice
Remarks:
Please check your distribution, operating system or hosting partner documentation on how to install/enable these modules.
Make sure your distribution’s php version fulfils the version requirements specified above. If it doesn’t, there might be custom repositories you can use. If you are e.g. running Ubuntu 10.04 LTS, you can update your PHP using a custom PHP PPA:
sudo add-apt-repository ppa:ondrej/php5
sudo apt-get update
sudo apt-get install php5
You don’t need any WebDAV support module for your web server (i.e. Apache’s mod_webdav) to access your ownCloud data via WebDAV. ownCloud has a built-in WebDAV server of its own.
Installation of packages on Ubuntu 12.04.4 LTS Server
On a machine running a pristine Ubuntu 12.04.4 LTS server, you would install the required and recommended modules for a typical ownCloud installation, using Apache and MySQL by issuing the following commands in a terminal:
sudo apt-get install apache2 mysql-server libapache2-mod-php5
sudo apt-get install php5-gd php5-json php5-mysql php5-curl
sudo apt-get install php5-intl php5-mcrypt php5-imagick
Remarks:
- This installs the packages for the ownCloud core system. If you are planning on running additional apps, keep in mind that they might require additional packages. See the list above for details.
- At the execution of each of the above commands you might be prompted whether you want to continue; press “Y” for Yes (that is if your system language is English. You might have to press a different key if you have a different system language).
- At the installation of the MySQL server, you will be prompted for a root password. Be sure to remember the password you enter there for later use (you will need it during ownCloud database setup).
Download, extract and copy ownCloud to Your Web Server
First, download the archive of the latest ownCloud version:
Navigate to the ownCloud Installation Page
Click “Tar or Zip file”
In the opening dialog, chose the “Linux” link.
This will start the download of a file named owncloud-x.y.z.tar.bz2 (where x.y.z is the version number of the current latest version).
Save this file on the machine you want to install ownCloud on. If that’s a different machine than the one you are currently working on, use e.g. FTP to transfer the downloaded archive file there.
Extract the archive contents. Open a terminal and run:
cd path/to/downloaded/archive
tar -xjf owncloud-x.y.z.tar.bz2
where path/to/downloaded/archive is to be replaced by the path where you put the downloaded archive, and x.y.z of course has to be replaced by the actual version number as in the file you have downloaded.
Copy the ownCloud files to their final destination in the document root of your webserver (you can skip this step if you already downloaded and extracted the files there):
sudo cp -r owncloud /path/to/your/webservers/document-root
where /path/to/your/webservers/document-root, needs to be replaced by the actual path where the document root of your webserver is configured to be.
If you don’t know where your webserver’s document root is located, consult its documentation. For Apache on Ubuntu 12.04 LTS for example, this would usually be /var/www. So the concrete command to run would be:
sudo cp -r owncloud /var/www
The above assumes you want to install ownCloud into a subdirectory “owncloud” on your webserver. For installing it anywhere else, you’ll have to adapt the above command (and also the commands in the following section) accordingly.
Set the Directory Permissions
The user running your web server must own at least the config/, data/ and apps/ directories in your ownCloud installation folder so that you can configure ownCloud, create/modify and delete your data files through ownCloud and install apps through the web interface. If you are planning on also using the automatic updater app for updating, the whole owncloud folder must be owned by (or at least be writable to) the user running php on your system.
Note
When using an NFS mount for the data directory, do not change ownership as above. The simple act of mounting the drive will set proper permissions for ownCloud to write to the directory. Changing ownership as above could result in some issues if the NFS mount is lost.
The following command will change the ownership of the whole ownCloud folder to that user.
The generic command to run is:
sudo chown -R <php-user>:<php-user> /path/to/your/webservers/document-root/owncloud
where <php-user> is to be replaced by the user running php scripts, and /path/to/your/webservers/document-root/owncloud by the folder where the extracted ownCloud files are located.
For Ubuntu 12.04 LTS server, where the owncloud folder was copied into the Apache document root at /var/www, and the user running Apache and php scripts is called www-data, this would mean you need to run:
sudo chown -R www-data:www-data /var/www/owncloud
For all Debian-based distributions (like Ubuntu, Debian or Linux Mint) and Gentoo, use www-data user
On ArchLinux, use http user.
On Fedora, use apache user.
When you had extracted ownCloud as user root, you should adjust file and directory permission to avoid world writeable files and folder:
find /path/to/your/webservers/document-root/owncloud -type d -exec chmod 750 {} \;
find /path/to/your/webservers/document-root/owncloud -type f -exec chmod 640 {} \;
Running this in combination with the above chown command will give a secure set-up.
Web Server Configuration
Note
You can use ownCloud over plain http, but we strongly encourage you to use SSL/TLS. If you don’t use it, and you for example access your ownCloud over an unsecured WiFi, everyone in the same WiFi can grab your authentication data or the content of files synchronized while you are on the WiFi.
Apache is the recommended web server.
Apache Configuration
Enabling SSL
An Apache installed under Ubuntu comes already set-up with a simple self-signed certificate. All you have to do is to enable the ssl module and the according site. Open a terminal and run:
sudo a2enmod ssl
sudo a2ensite default-ssl
sudo service apache2 reload
If you are using a different distribution, check their documentation on how to enable SSL.
Note
Self-signed certificates have their drawbacks - especially when you plan to make your ownCloud server publicly accessible. You might want to consider getting a certificate signed by an official signing authority. SSLShopper for example has an article on your options for free SSL certificates.
Configuring ownCloud
Since there was a change in the way versions 2.2 and 2.4 are configured, you’ll have to find out which Apache version you are using.
Usually you can do this by running one of the following commands:
sudo apachectl -v
apache2 -v
Example output:
Server version: Apache/2.2.22 (Ubuntu)
Server built:   Jul 12 2013 13:37:10
This indicates an Apache of the 2.2 version branch (as e.g. you will find on Ubuntu 12.04 LTS).
Example config for Apache 2.2:
<Directory /path/to/your/owncloud/install>
    Options Indexes FollowSymLinks MultiViews
    AllowOverride All
    Order allow,deny
    allow from all
</Directory>
Example config for Apache 2.4:
<Directory /path/to/your/owncloud/install>
    Options Indexes FollowSymLinks MultiViews
    AllowOverride All
    Require all granted
</Directory>
This config entry needs to go into the configuration file of the “site” you want to use.
On a Ubuntu system, this typically is the “default-ssl” site (to be found in the /etc/apache2/sites-available/default-ssl).
Edit the site file with your favorite editor (note that you’ll need root permissions to modify that file). For Ubuntu 12.04 LTS, you could for example run the following command in a Terminal:
sudo nano /etc/apache2/sites-available/default-ssl
Add the entry shown above immediately before the line containing:
</VirtualHost>
(this should be one of the last lines in the file).
A minimal site configuration file on Ubuntu 12.04 might look like this:
<IfModule mod_ssl.c>
<VirtualHost _default_:443>
        ServerName YourServerName
        ServerAdmin webmaster@localhost
        DocumentRoot /var/www
        <Directory />
                Options FollowSymLinks
                AllowOverride None
        </Directory>
        <Directory /var/www/>
                Options Indexes FollowSymLinks MultiViews
                AllowOverride None
                Order allow,deny
                allow from all
        </Directory>
        ErrorLog ${APACHE_LOG_DIR}/error.log
        LogLevel warn
        CustomLog ${APACHE_LOG_DIR}/ssl_access.log combined
        SSLEngine on
        SSLCertificateFile    /etc/ssl/certs/ssl-cert-snakeoil.pem
        SSLCertificateKeyFile /etc/ssl/private/ssl-cert-snakeoil.key
        <FilesMatch "\.(cgi|shtml|phtml|php)$">
                SSLOptions +StdEnvVars
        </FilesMatch>
        <Directory /usr/lib/cgi-bin>
                SSLOptions +StdEnvVars
        </Directory>
        BrowserMatch "MSIE [2-6]" \
                nokeepalive ssl-unclean-shutdown \
                downgrade-1.0 force-response-1.0
        BrowserMatch "MSIE [17-9]" ssl-unclean-shutdown
        <Directory /var/www/owncloud>
                Options Indexes FollowSymLinks MultiViews
                AllowOverride All
                Order allow,deny
                Allow from all
                # add any possibly required additional directives here
                # e.g. the Satisfy directive (see below for details):
                Satisfy Any
        </Directory>
</VirtualHost>
</IfModule>
For ownCloud to work correctly, we need the module mod_rewrite. Enable it by running:
sudo a2enmod rewrite
In distributions that do not come with a2enmod, the module needs to be enabled manually by editing the Apache config files, usually /etc/httpd/httpd.conf. consult the Apache documentation or your distributions documentation.
In order for the maximum upload size to be configurable, the .htaccess in the ownCloud folder needs to be made writable by the server (this should already be done, see section Set the Directory Permissions).
You should make sure that any built-in WebDAV module of your web server is disabled (at least for the ownCloud directory), as it will interfere with ownCloud’s built-in WebDAV support.
If you need the WebDAV support in the rest of your configuration, you can turn it off specifically for the ownCloud entry by adding the following line in the configuration of your ownCloud. In above “<Directory ...” code, add the following line directly after the allow from all / Require all granted line):
Dav Off
Furthermore, you need to disable any server-configured authentication for ownCloud, as it’s internally using Basic authentication for its *DAV services. If you have turned on authentication on a parent folder (via e.g. an AuthType Basic directive), you can turn off the authentication specifically for the ownCloud entry; to do so, in above “<Directory ...” code, add the following line directly after the allow from all / Require all granted line):
Satisfy Any
When using ssl, take special note on the ServerName. You should specify one in the server configuration, as well as in the CommonName field of the certificate. If you want your ownCloud to be reachable via the internet, then set both these to the domain you want to reach your ownCloud under.
Note
By default, the certificates’ CommonName will get set to the host name at the time when the ssl-cert package was installed.
Finally, restart Apache.
For Ubuntu systems (or distributions using upstartd), run:
sudo service apache2 restart
For systemd systems (Fedora, ArchLinux, OpenSUSE), run:
systemctl restart httpd.service
Nginx Configuration
You need to insert the following code into your nginx config file.
Adjust server_name, root, ssl_certificate and ssl_certificate_key to suit your needs.
- Make sure your SSL certificates are readable by the server (see the
upstream php-handler {
        server 127.0.0.1:9000;
        #server unix:/var/run/php5-fpm.sock;
}

server {
        listen 80;
        server_name cloud.example.com;
        return 301 https://$server_name$request_uri;  # enforce https
}

server {
        listen 443 ssl;
        server_name cloud.example.com;

        ssl_certificate /etc/ssl/nginx/cloud.example.com.crt;
        ssl_certificate_key /etc/ssl/nginx/cloud.example.com.key;

        # Path to the root of your installation
        root /var/www/;

        client_max_body_size 10G; # set max upload size
        fastcgi_buffers 64 4K;

        rewrite ^/caldav(.*)$ /remote.php/caldav$1 redirect;
        rewrite ^/carddav(.*)$ /remote.php/carddav$1 redirect;
        rewrite ^/webdav(.*)$ /remote.php/webdav$1 redirect;

        index index.php;
        error_page 403 /core/templates/403.php;
        error_page 404 /core/templates/404.php;

        location = /robots.txt {
            allow all;
            log_not_found off;
            access_log off;
        }

        location ~ ^/(data|config|\.ht|db_structure\.xml|README) {
                deny all;
        }

        location / {
                # The following 2 rules are only needed with webfinger
                rewrite ^/.well-known/host-meta /public.php?service=host-meta last;
                rewrite ^/.well-known/host-meta.json /public.php?service=host-meta-json last;

                rewrite ^/.well-known/carddav /remote.php/carddav/ redirect;
                rewrite ^/.well-known/caldav /remote.php/caldav/ redirect;

                rewrite ^(/core/doc/[^\/]+/)$ $1/index.html;

                try_files $uri $uri/ index.php;
        }

        location ~ ^(.+?\.php)(/.*)?$ {
                try_files $1 =404;

                include fastcgi_params;
                fastcgi_param SCRIPT_FILENAME $document_root$1;
                fastcgi_param PATH_INFO $2;
                fastcgi_param HTTPS on;
                fastcgi_pass php-handler;
        }

        # Optional: set long EXPIRES header on static assets
        location ~* ^.+\.(jpg|jpeg|gif|bmp|ico|png|css|js|swf)$ {
                expires 30d;
                # Optional: Don't log access to assets
                access_log off;
        }

}
To enable SSL support: - Remove the server block containing the redirect - Change listen 443 ssl to listen 80; - Remove ssl_certificate and ssl_certificate_key. - Remove fastcgi_params HTTPS on;
Note
If you want to effectively increase maximum upload size you will also have to modify your php-fpm configuration (usually at /etc/php5/fpm/php.ini) and increase upload_max_filesize and post_max_size values. You’ll need to restart php5-fpm and nginx services in order these changes to be applied.
Lighttpd Configuration
This assumes that you are familiar with installing PHP application on lighttpd.
It is important to note that the .htaccess used by ownCloud to protect the data folder are ignored by lighttpd, so you have to secure it by yourself, otherwise your owncloud.db database and user data are publicly readable even if directory listing is off. You need to add two snippets to your lighttpd configuration file:
Disable access to data folder:
$HTTP["url"] =~ "^/owncloud/data/" {
        url.access-deny = ("")
}
Disable directory listing:
$HTTP["url"] =~ "^/owncloud($|/)" {
        dir-listing.activate = "disable"
}
Note for Lighttpd users on Debian stable (wheezy):
Recent versions of ownCloud make use of the HTTP PATCH feature, which was added to Lighttpd at version 1.4.32 while Debian stable only ships 1.4.31. The patch is simple, however, and easy to integrate if you’re willing to build your own package.
Download the patch from http://redmine.lighttpd.net/attachments/download/1370/patch.patch
Make sure you have the build tools you need:
apt-get build-dep lighttpd
apt-get install quilt patch devscripts
Patch the package source:
apt-get source lighttpd
cd lighttpd-1.4.31
export QUILT_PATCHES=debian/patches # This tells quilt to put the patch in the right spot
quilt new http-patch.patch
quilt add src/connections.c src/keyvalue.c src/keyvalue.h # Make quilt watch the files we'll be changing
patch -p1 -i /patch/to/downloaded/patch.patch
quilt refresh
Increment the package version with dch -i. This will open the changelog with a new entry. You can save as-is or add info to it. The important bit is that the version is bumped so apt will not try to “upgrade” back to Debian’s version.
Then build with debuild and install the .debs for any Lighttpd packages you already have installed.
Yaws Configuration
This should be in your yaws_server.conf. In the configuration file, the dir_listings = false is important and also the redirect from /data to somewhere else, because files will be saved in this directory and it should not be accessible from the outside. A configuration file would look like this
<server owncloud.myserver.com/>
        port = 80
        listen = 0.0.0.0
        docroot = /var/www/owncloud/src
        allowed_scripts = php
        php_handler = <cgi, /usr/local/bin/php-cgi>
        errormod_404 = yaws_404_to_index_php
        access_log = false
        dir_listings = false
        <redirect>
                /data == /
        </redirect>
</server>
The Apache .htaccess that comes with ownCloud is configured to redirect requests to nonexistent pages. To emulate that behaviour, you need a custom error handler for yaws. See this github gist for further instructions on how to create and compile that error handler.
Hiawatha Configuration
Add WebDAVapp = yes to the ownCloud virtual host. Users accessing WebDAV from MacOS will also need to add AllowDotFiles = yes.
Disable access to data folder:
UrlToolkit {
    ToolkitID = denyData
    Match ^/data DenyAccess
}
Microsoft Internet Information Server (IIS)
See Windows 7 and Windows Server 2008 for further instructions.
Follow the Install Wizard
- Open your web browser
- Navigate to your ownCloud instance.
- If you are installing ownCloud on the same machine as you are accessing the install wizard from, the url will be https://localhost/owncloud
- If you are installing ownCloud on a different machine, you’ll have to access it by its hostname or IP address, e.g. https://example.com/owncloud
- If you are using a self-signed certificate, you will be presented with a security warning about the issuer of the certificate not being trusted which you can ignore.
- You will be presented with the setup screen
- Enter username and password for the administrative user account
- Expand Advanced options to choose a data folder and the database system
- If you are not using Apache as the web server, please set the data directory to a location outside of the document root.
- If following the Ubuntu-Apache-MySQL walk-through:
- choose MySQL as Database backend (you might not be presented with any other choice if you haven’t installed any other database systems).
- As Database host, enter localhost.
- As Database user enter root.
- As Database password, enter the password you entered during installation of the MySQL server package.
- As Database name, enter an arbitrary name as you see fit
- Beware that there are restrictions as to what characters a database name may or may not contain, see the MySQL Schema Object Names documentation for details);
- Make sure to choose a name under which no database exists yet
- ownCloud will use the provided credentials and create its own user with permissions only on its own database.
- In general, you have the following choices regarding the database:
- For basic installs we recommend SQLite as it is easy to setup (ownCloud will do it for you). The performance when using sqlite is however inferior to the two other options.
- For larger installs you should use MySQL or PostgreSQL.
- Note that you will only be able to choose among the php database connectors which are actually installed on the system (see package requirements above).
- Further, it is not easily possible to migrate to another database system once you have set up your ownCloud to use a specific one. So make sure to carefully consider which database system to use.
- When using MySQL or PostgreSQL you have two options regarding the database
name and user account you specify:
- You can specify either an admin/root user, and the name of a database which does not yet exist. This lets ownCloud create its own database; it will also create a database user account with restricted rights (with the same username as you specified for the administrative user, plus an oc_ prefix) and will use that for all subsequent database access.
- You can enter the name of an existing database and the username/password
of a user with restricted permissions
- You can create such a user yourself e.g. via phpmyadmin.
- This user shouldn’t have permission to create a database.
- It should have full permissions on the (existing) database with the name you specify.
- Press “Finish Setup”
- ownCloud will set up your cloud according to the given settings
- When its finished, it will log you in as administrative user and present the “Welcome to ownCloud” screen.
Note
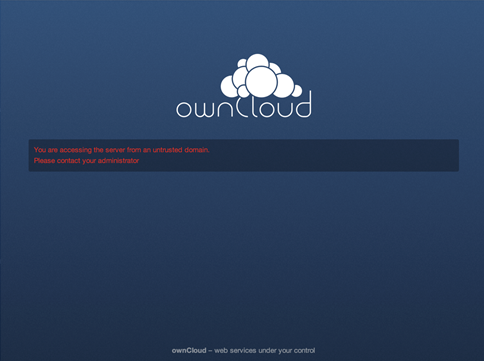
When the initial ownCloud configuration is performed, ownCloud will take the URL used to access it and insert that the config.php file under the ‘trusted_domains’ header.
Users will only be able to log into ownCloud when the addressed URL is as stated in the ‘trusted_domans’ header in the config.php file.
In the event that a load balancer is in place, as long as it sends the correct X-Forwarded-Host header, there will be no issues.
It should be noted that the loopback address, 127.0.0.1, is white labeled and therefore users on the ownCloud server who access ownCloud with the loopback will successfully login. In the event that an improper URL is used, the following error will appear:
For configuration examples, refer to the config.php document.