User Management
ownCloud administrators can easily manage users via the web interface. To go into user management page, click your username on the web interface and select Users. A page similar to the image below will be shown:
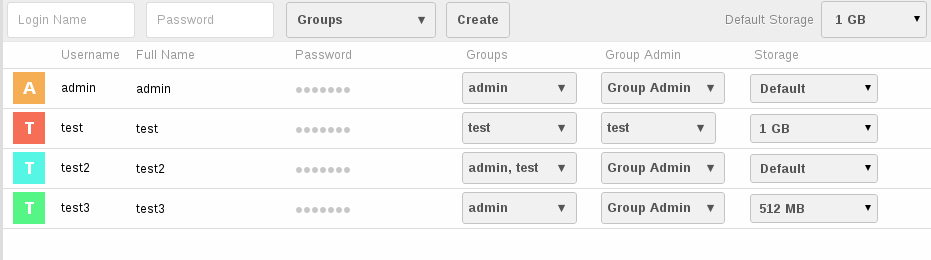
Users management page
A fictive use case will help you understand the concept of users, user groups and group admins.
Think of a small, 25-member staff company, named “Cloud Lovers”, that is lead by its founder Richard. In this company Bob acts as IT operator and recently set up ownCloud. Being the installing user, Bob is member of the so called “admin” user group of ownCloud. His colleague Tom, who provides support if Bob is on holiday, is member of the “admin” user group as well. All employees, including Bob and Tom, are members of the user group “Internal”, that is used to share data across the company. Mostly for operational data, that should not be accessible to all employees, Bob created the “Administration” user group having two members: Richard and his assistant Susan. Richard is group admin of this user group, so he can manage the members of the “Administration” user group on his own.
Users
A user represents an account of the ownCloud installation. In this section the core properties are listed.
- Login name (Username)
- This is the unique ID of a ownCloud user (e.g. test, jon.doe).
- Full Name
- This is the name that is used all over the user interface to identify the user i.e. when sharing data or sending mails. If no display name is set, it defaults to the login name.
- Password
- This is the password the user uses to login to ownCloud.
- Groups
- This is a list of security groups the user is assigned to. By default the user is not member of any user group.
- Group Admin
- This is a list of security groups the user has administration privileges for. By default the user is not registered as group admin for any user group.
- Storage
- This is the maximum disk space that may be used by the user. If the user reaches this limit he/she is not able to upload or sync further data. The storage quota is specified in the format Number Unit (e.g. 100 B (byte), 50 KB (kilobyte), 20 MB (megabyte), 5 GB (gigabyte)). If no unit is given, the number is interpreted as bytes.
Each user is able to change its display name and password.
Create a user
Before users can sign in and share data, they need ownCloud user accounts.
To create a user account:
Enter the new user’s Login Name and its initial Password in the appropriate fields.
(Optional) Select the Groups to which you want to assign the new user.
Click Create.
(Optional) Edit additional user settings.
To set other user settings, such as setting a display name or limiting the user’s storage, see instructions as follows.
Created users will have the storage specified on Default Storage setting on the same page.
Login names may contain letters (a-z, A-Z), numbers (0-9), dashes (-), underscores (_), periods (.) and at signs (@).
Reset a user’s password
To reset a user’s password:
- Hover the line of the user.
- Click on the pencil icon next to the password field.
- Enter the user’s new password in the password field and then hit the Enter key of your keyboard.
Remember to provide the user with the new login information after you have reset the password.
Rename a user
Each ownCloud user has two names: an unique login name used for authentication, and a display name (e.g. the user’s first name and last name) used in the user interface. You can edit the display name of a user, but you cannot change the login name of any user.
To set a user’s display name:
- Hover the line of the user.
- Click on the pencil icon next to the display name field.
- Enter the user’s new display name in the corresponding field and then hit the Enter key of your keyboard.
Grant administrator privileges to a user
If a user has administrator privileges, the user has the right to manage other users. Within ownCloud there are two types of administrators: Super Administrators and Group Administrators.
Group administrators have the management rights to:
- Create new users and assign them to the group of the group administrator
- Edit and delete users that are assigned to the group of the group administrator
Group administrators cannot access system settings or modify installation-wide configuration like the default storage.
To assign the super administrator role to a user:
- Use the drop-down list in Groups column of the user
- Assign the user to the “admin” user group
To assign the group administrator role to a user:
Find the user and select the user groups from the Group Admin drop-down list you want the user become group administrator for.
Assign a user to a user group
To assign a user to a user group:
Find the user and select the user groups from the Groups drop-down list you want to assign the user to. You can use add group link to create a new group to assign the user to. You can assign the user more than one group by checking multiple groups.
Note
If a file/folder is shared with a group, newly created users will immediately have access to the share.
Note
If you assign a user to the admin user group, the user will become a Super Administrator with unlimited privileges.
Limit a user’s storage
To limit a user’s storage quota:
Find the user and select an item from the Storage drop-down list.
- If you select Default, the default storage limit, specified in the action bar at the top, is applied.
- If you select Unlimited, the user is not limited until the total disk space is consumed.
- If you want to enter a custom limit, select Other..., enter the storage quota of your choice and hit the Enter key of your keyboard.
If you edit the value of the Default Storage field in the action bar, all users with storage Default are affected by this change, i.e. changing the default storage from Unlimited to 1 GB will cause all users with Default storage being limited to 1 GB storage each.
Delete User
Important considerations before deleting a user:
- The user will no longer be able to sign in to your ownCloud installation.
- You cannot revert the deletion or restore a deleted account.
Note
If this user had a share with a group or user, the share also will be deleted permanently.
To delete a user account:
- Hover the line of the user you want to delete.
- Click the cross icon at the end of the line.
Note
If you accidentally delete a user, you can use undo button shown on notification bar at the top of the page.
User Groups
Create Group
To create a user group:
- Open the Groups drop-down list in the action bar.
- Click add group.
- Enter the name of the new group and then hit the Enter key of your keyboard.
You can assign users to the newly created user groups anytime by using users’ group drop-down list.
Edit/Delete Group
Currently, groups cannot be edited (e.g. renamed) or removed. This feature will be available in a future version of ownCloud.
Note
If you have direct access to the database, you can manually delete the group from database tables oc_groups and oc_group_user.